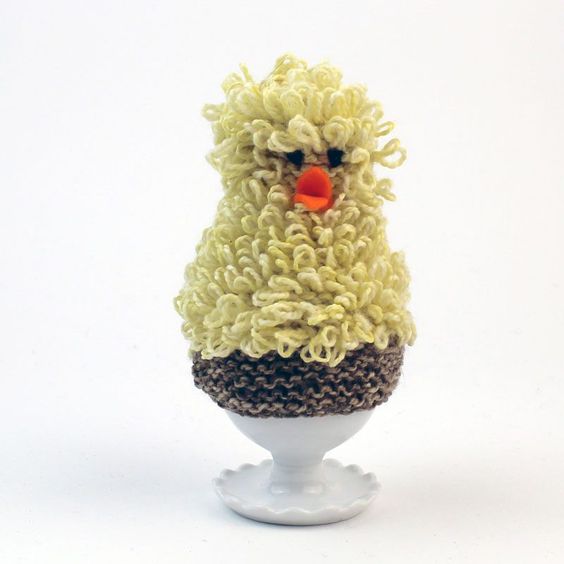
Knitted Easter Chick Egg Cosy
Crafted with care and attention to detail, this adorable Easter chick egg cosy is the perfect addition to your holiday decor. Hand-knitted using soft, pastel-colored yarn, this charming accessory will keep your boiled eggs warm and cozy while adding a touch of whimsy to your breakfast table. The intricate stitching and cute design make this egg cosy a delightful conversation piece that will bring a smile to your face every morning. Whether you're hosting a festive Easter brunch or simply enjoying a quiet breakfast at home, this knitted egg cosy is sure to brighten up your day. The fluffy texture of the yarn adds a cozy feel to your mealtime, while the playful chick design adds a fun and festive touch to your table setting. Treat yourself to a little bit of handmade charm with this sweet and practical accessory that is as functional as it is cute.

Materials & Tools
- 1 pair of 2.75 mm needles
- 50 g of Yellow Ochre-dyed 100% Merino Wool
- scrap yarn in contrasting color to make the base – we have used our Burnt Amber-dyed 100% Merino Wool
- small pieces of black and orange felt
Size: 10 cm tall, 8 cm wide
Note
How to do the Fur Stitch
RS: K the next stitch without letting it drop off the RH needle. Bring yfwd, pass the yarn around your thumb to make a loop, yb, and knit into the stitch on the LH needle, this time completing the stitch by letting it drop off. Pass the first incomplete stitch (now on the RH needle) over the second stitch to secure the loop.
Abbreviations
- inc: increase 1 stitch by knitting into the front and back of a stitch
- K: knit
- K2tog: knit 2 stitches together
- Ktbl: Knit stitch through the back of loop
- LH: Left hand needle
- p: purl
- RH: right hand needle
- Sl 1: slip one stitch
- St(s): stitch(es)
- Yfwd: yarn forward
- Yb: yarn back
The Directions
Back of chick
Using 2.75 mm needles and brown yarn cast on 20 sts.
ROW1: (Ktbl, K1) to last two sts, K1 ktbl
Knit 9 rows
Change to two strands of yellow yarn and proceed as follows:
ROW1: K2tog, knit to last 2sts k2tog
ROW2: K to end
ROW3: RS K1, make a fur st loop on every st to last st, k1
ROW4: as row 2
ROW5: as row 3
ROW6: K2tog, k to last two sts, k2tog
Repeat rows 5 & 6 until 8 sts have been achieved finishing on row 5
ROW7: Inc, K to last st, inc
ROW8: RS K1, make a fur st loop on every st to last st, k1
ROW9: Inc, knit to last st, inc.
ROW10: RS K1, make a fur st loop on every st to last st, k1
ROW11: Knit to end
ROW12: RS K1, make a fur st loop on every st to last st, k1
ROW13: K2tog, k to last 2 sts, k2tog.
Repeat rows 12 and 13 until 6 sts have been achieved ending with row 12.
ROW14: K2tog to end of row.
Cast off.
Front of chick
As back, until 8 sts have been achieved ending on row 5.
ROW6: Inc, knit to last st, inc
ROW7: K1, make fur st loop on next st, k6, make fur st loop on next st, k1.
ROW8: Inc, knit to last st, inc
ROW9: K1, make fur st loop on next 2 sts, k6, make fur st loop on next 2 sts, k1.
ROW10: Knit to end
ROW11: K1, make fur st loop on next 2 sts, k6, make fur st loop on next 2 sts, k1.
ROW12: Knit to end
ROW13: K2tog, knit to last 2sts, K2tog
ROW14: K1, make a fur st loop on every st to last st, k1.
Repeat rows 13 and 14 until 6 sts have been achieved ending on row 15.
ROW 16: K2tog to end of row.
Cast off.
To make up
Sew in threads. Make felt beak and eyes and add to front of chic using invisible thread. Join front and back using a mattress stitch.