Knitted Beautiful Shawl
Crafted with care and attention to detail, this exquisite shawl showcases intricate knitting techniques that result in a stunning and elegant accessory. The soft yarn used in its creation adds a touch of luxury, making it not only beautiful but also incredibly comfortable to wear. The delicate patterns and textures woven into the fabric give the shawl a unique and timeless appeal, perfect for adding a touch of sophistication to any outfit. This hand-knitted shawl is a true work of art, combining traditional craftsmanship with modern style. The careful selection of colors and stitches creates a piece that is not only visually appealing but also versatile, suitable for both casual and formal occasions. Whether draped over the shoulders on a cool evening or wrapped around the neck for a chic look, this shawl is sure to become a beloved wardrobe staple for years to come.
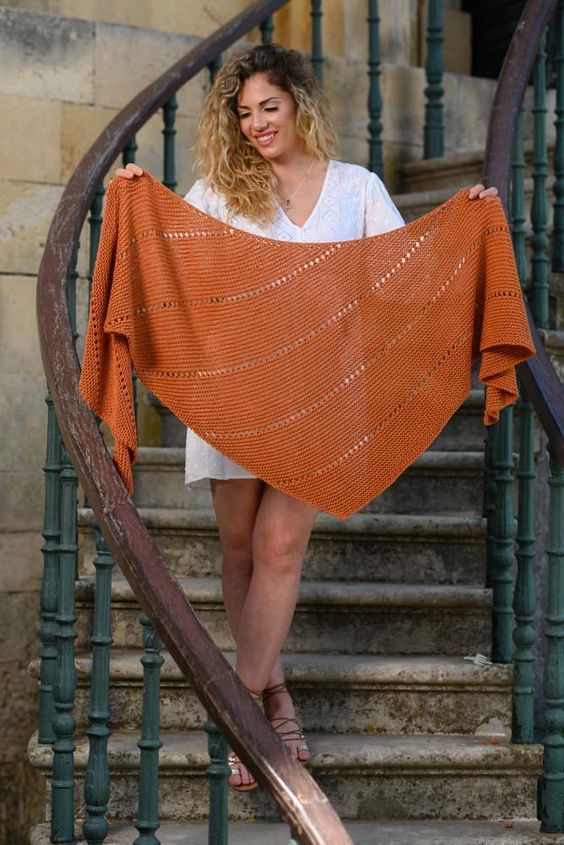
Skill Level – Easy
Size Information
One Size.
Length tip to tip (wingspan) = 66 inches/168 cm.
Width at the widest point = 25 inches/64 cm.
Gauge – 16 sts/24 rows in 4 inches/10 cm in garter stitch.
The supplies you need…
Yarn
- The Pima Cotton from We Are Knitters in Copper (This cotton is 100% Pima Cotton / 100g/3.05oz/232 yds/212m.
- This is an Aran/Worsted/10 Ply yarn.
- You will need 4 balls = (400g/928yds/848m).
Needles
- 5 mm (US 8) 100 cm/40″ circular needles.
- I used my interchangeable circular needles on a 100 cm/40″ cable.
- I did not join in the round to knit the shawl.
- The shawl is worked back and forth on the needles – knit flat.
- The long cable was used to accommodate the number of stitches.
Notions
- Scissors
- Darning needle
- Tape measure
- Stitch marker
Knitting Abbreviations
- CO – Cast on
- Cont – Continue
- K – Knit
- KFB – Knit into the front and back of the stitch (increase)
- K1fbf – Knit into the front, back, front (increase)
- K2tog – Knit the next two stitches together (decrease)
- Sl1wyif – slip 1 st with yarn in front (slip 1 st as if to purl, holding the yarn at the front of the work)
- St(s) – Stitch(es)
- Rep – Repeat
- RS – Right side
- WS – Wrong side
- YO – Yarn over
Pattern Instructions
Worked flat knitting back and forth on two needles:
Tip – Place a stitch marker on the RS of the work – so you know which side you are making the increases on.
Set up
- CO 3 sts.
- Row 1 (WS): K3.
- Row 2 (RS): KFB, K1, KFB.
- Row 3: sl1wyif, K4.
- Row 4: sl1wyif, K1fbf, K to the last 3 sts, K2tog, K1. (6 sts)
- Row 5: sl1wyif, K5.
- Row 6: sl1wyif, K1fbf, K to the last 3 sts, K2tog, K1. (7 sts)
- Row 7: sl1wyif, K6.
- Row 8: sl1wyif, K1fbf, K to the last 3 sts, K2tog, K1. (8 sts)
- Row 9: sl1wyif, K to end.
Rep rows 8 and 9 until you have 20 sts.
The main body of the shawl
Start working the pattern repeat as follows:
The Yarn Over Stripe
- Row 1 (RS): sl1wyif, K1fbf, *YO, K2tog – rep to the last 2 sts, K2.
- Row 2 (WS): sl1wyif, K to the end of the row.
Please note you may have two or three stitches remaining, if you have two, K2. If you have three, complete one last YO, K2tog and K1.
The Garter Stitch Stripe
- Row 1 (RS): sl1wyif, K1fbf, K to the last 3 sts, K2tog, K1.
- Row 2 (WS): sl1wyif, K to the end of the row.
Rep rows 1 and 2 until you have knit 30 rows in garter stitch.
(This looks like 15 garter ridges on both sides of the knitted fabric).
Continue to repeat the yarn over rows and garter stitch rows until you have your desired length or have completed a total of 10 garter stitch sections.
You can add more or fewer sections depending on the size that you want the shawl to be.
End with a section of 30 rows in garter stitch.
Cast off all sts.
Finishing and Blocking
You may wish to block your shawl; you can do that as follows:
- Make sure all ends are woven in using a tapestry needle or method of choice.
- Gently block by filling a sink or water basin with lukewarm water, add a small amount of rinse less wool wash.
- Place the items in the water and gently massage out any air bubbles.
- Drain water, gently squeezing out any excess water from the item, then roll in a towel, and stomp on the towel roll to remove any more excess water.
- Lay the item out on a towel to approx. finished wingspan measurements and allow to dry completely.