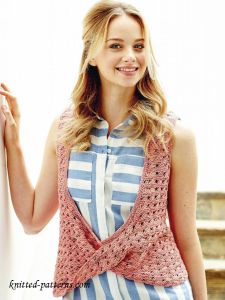
Knitted Lace Vest
The knitted lace vest is a versatile and charming addition to any wardrobe. Its delicate lace pattern gives it a touch of elegance while its cozy knit material adds warmth and comfort. This stylish garment can easily be dressed up for a special occasion or worn casually for a relaxed day out. The intricate details of the lace design make it a unique and eye-catching piece that will surely receive compliments wherever you go. Whether you layer it over a simple top or pair it with your favorite dress, the knitted lace vest is a must-have item that will elevate your style with its timeless beauty. So go ahead, embrace the charm of the knitted lace vest and let your fashion sense shine!
Materials
♦ Yarn
5 (6:6:7:8) x 50g balls of Rowan Tetra Cotton in Maggiore (shade 006)
♦ Needles
1 pair 3.25mm (UK 10, US 3) knitting needles
1 pair 4mm (UK 8, US 6) knitting needles
3.25mm (UK 10, US 3) circular needle, at least 100cm long
Cable needle
♦ Accessories
Stitch markers in green, red, yellow and blue
Yarn detail
♦ Rowan Tetra Cotton
♦ 100% cotton
♦ 50g/130m (142yrd)
♦ Handwash at 30°C
Tension
22 sts and 30 rows to 10cm or 4in measured over patt using 4mm knitting needles
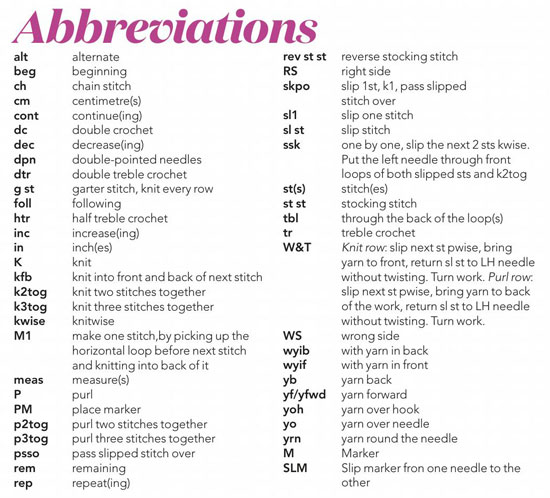
Special Abbreviation
C6B slip next 3 sts onto cable needle dropping extra loops and leave at back of work, K3 dropping extra loops, then K3 from cable needle.
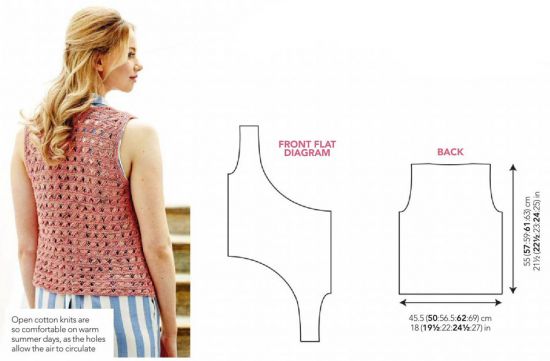
BACK
Using 4mm needles cast on 100 (110:124:136:152) sts.
Work in patt as folls:
Rows 1-3: Knit.
Row 4 (WS): K to the end of the row, wrapping yarn 3 times round needle for every st.
Row 5: K2 (1:2:2:1) dropping extra loops, *C6B, rep from * to last 2 (1:2:2:1) sts, K2 (1:2:2:1) dropping extra loops.
Row 6: Knit.
These 6 rows form patt.
Work in patt for a further 90 (90:96:96:102) rows, ending after patt row 6 and with RS facing for next row.
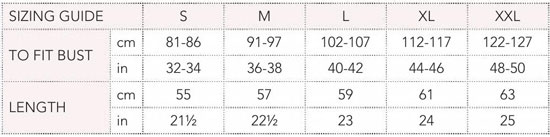
Back should measure approximately 32 (32:34:34:36) cm, 12 1/2 (12 1/2:13 1/2:13 1/2:14 1/4) in.
SHAPE ARMHOLES
Keeping patt correct, cast off 5 (6:7:8:9) sts at beg of next 2 rows, placing green markers on first cast-off st of each of these rows (to denote top of side seams). 90 (98:110:120:134) sts
Dec 1 st at each end of next 5 (7:7:9:11) rows, then on foll 5 (5:7:7:8) alt rows, then on foll 4th row. 68 (72:80:86:94) sts
Work a further 41 (45:41:45:41) rows, ending after patt row 2 and with RS facing for next row.
SHAPE BACK NECK
Next row (RS): Patt 20 (22:25:28:31) sts and turn, leaving remaining sts on a holder.
Work each side of neck separately. Keeping pattern correct, decrease 1 st at neck edge of next 4 rows. 16(18:21:24:27) sts
Work 1 row, ending after patt row 2 and with RS facing for next row.
SHAPE SHOULDER
Cast off. With RS facing, slip centre 28 (28:30:30:32) sts onto a holder, rejoin yarn, patt to end. Complete to match first side, reversing shapings.
FRONT
Using 4mm needles, cast on 16 (18:21:24:27) sts. This is left shoulder seam edge.
Work in patt as folls:
Rows 1-3: Knit, placing a red marker on last st of first of these rows (to denote neck edge of shoulder seam).
Row 4 (WS): K to end, wrapping yarn 3 times round needle for every st.
Row 5: K4 (0:4:1:2) dropping extra loops, (C6B) 2 (3:2:3:4) times, K0 (0:5:5:1) dropping extra loops.
Row 6: Knit.
These 6 rows form patt.
Cont in patt for a further 40 (44:40:44:40) rows, ending with RS facing for the next row.
SHAPE LEFT ARMHOLE
Keeping patt correct, inc 1 st at beg (armhole edge) of next and 0 (1:1:1:1) foll 4th row, then on foll 0 (0:2:3:5) alt rows, taking inc sts into patt. 17 (20:25:29:34) sts
Work 3 (1:1:1:1) rows, ending with RS facing for next row.
SHAPE LEFT SIDE OF FRONT NECK
Inc 1 st at end (neck edge) of next and foil 6th row, then on 2 foll 4th rows and at same time inc 1 st at armhole edge of next and foll 5 (4:4:3:2) alt rows, then on foll 4 (6:6:8:10) rows, taking all inc sts into patt. 31 (35:40:45:51) sts.
Work 1 row, ending with RS facing for next row. Keeping patt correct, cast on 5 (6:7:8:9) sts at beg of next row. 36 (41:47:53:60) sts.
Place a green marker on first cast-on st (to denote top of left side seam). Left armhole shaping is now complete. Now continue to shape left side of front neck as follows: Work 1 row, ending with RS facing for next row.
Increase 1 st at neck edge of next and 2 following 4th rows, then on following 4 alternate rows, then on following 4 rows, taking inc sts into patt, ending after pattern row 5 and with wrong sides facing for next row. 47 (52:58:64:71) sts
This completes left side of neck shaping. Cast on 89 (94:102:108:117) sts at beg of next row. 136 (146:160:172:188) sts
Place a second red marker at beg of this row (to denote base of right side seam). Place a yellow marker after 68th (73rd:80th:86th:94th) cast-on st (to denote centre front). Edge between 2nd red marker and yellow marker is right front hem edge, and edge between yellow marker and first red marker is left front neck edge.
Work 72 (72:78:78:84) rows, ending after patt row 6 and with RS facing for next row. Cast off 88 (93:101:107:116) sts at beg of next row. 48 (53:59:65:72) sts
Place a blue marker at beg of this row (to denote base of left side seam). Place a 2nd yellow marker after 68th (73rd:80th:86th:94th) cast-off st (to denote centre front).
Edge between blue marker and yellow marker is left front hem edge; edge beyond yellow marker is beginning of right front.
SHAPE RIGHT SIDE OF FRONT NECK
Keeping patt correct, dec 1 st at neck (cast-off) edge of next 6 rows, then on foll 4 alt rows, then on 2 foll 4th rows. 36 (41:47:53:60) sts
Work 2 rows, ending with WS facing for next row. Place second green marker at end of last row (to denote top of right side seam).
SHAPE RIGHT ARMHOLE
Keeping patt correct, cast off 5 (6:7:8:9) sts at beg of next row. 31 (35:40:45:51) sts
Dec 1 st at armhole edge of next 5 (7:7:9:11) rows, then on foll 5 (5:7:7:8) alt rows, then on foll 4th row and at same time dec 1 st at neck edge of next and 2 foll 4th rows, then on foll 6th row. 16 (18:21:24:27) sts
Work a further 45 (49:45:49:45) rows, ending after patt row 6 and with RS facing for next row. Cast off, placing a 2nd blue marker on first cast-off stitch (to denote neck edge of shoulder seam). This is the right shoulder seam edge.
MAKING UP
Press the pieces as described on the ball band. Join the right shoulder seam using back stitch, or mattress stitch if preferred.
RIGHT ARMHOLE BORDER
With RS facing and using 3.25mm (US 3) needles, beg and ending at green markers, pick up and knit 106 (116:118:130:132) sts evenly all round right armhole edge. Work in g st for 4 rows, ending with wrong side facing for next row.
Cast off knitwise on WS.
Now join right armhole border and side seam - second red marker on front will match to cast-on edge of back. Lay garment flat with left front shoulder (cast-on) edge extending down below right front and back hem edges.
Now fold left front shoulder section up so that it meets left shoulder of back and a gentle twist is formed at centre front - original right side of left front shoulder section now becomes wrong side of garment. Join left shoulder seam.
LEFT ARMHOLE BORDER
Work as given for right armhole border. Now join left armhole border and side seam - first blue marker on front will match to cast-on edge of back.
NECK BORDER
Beginning at the second yellow marker on the front hem/neck cast-off edge, with RS of garment facing and using 3.25mm circular needle, pick up and knit 20 (20:21:21:22) sts along rem section of this cast-off edge from yellow marker to beg of right side of front neck shaping, 68 (72:72:76:76) sts up right side of front neck to second blue marker on right shoulder seam, and 5 sts down right side of back neck, knit across 28 (28:30:30:32) sts on back holder, pick up and knit 5 stitches up left side of back neck to first red marker on the left shoulder seam, 67 (71:71:75:75) stitches down the left side of front neck to the front hem/neck cast-on edge, then 21 (21:22:22:23) sts along front hem/neck cast-on edge to first yellow marker. 214 (222:226:234:238) sts
Work in st for 4 rows, ending with WS facing for next row. Cast off knitwise (on WS).
Join the ends of the borders where they meet as yellow markers, using back stitch or mattress stitch.