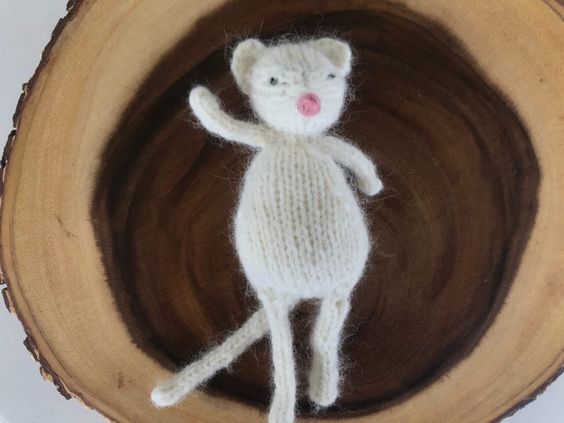
Knitted Adorable Mouse
The knitted adorable mouse is an absolute charmer! Its tiny size and detailed stitches make it a delightful addition to any collection. Whether gifted as a thoughtful present or displayed as a cute home decor accent, this little mouse never fails to bring a smile to everyone's face. Its whimsical design and soft texture make it a joy to hold in your hand. Adding a touch of warmth and coziness to any room, the knitted mouse is sure to become a beloved companion in no time. It's impossible not to feel a fondness for this sweet creation!
Supplies Needed for Knit Mouse:
- Bulky yarn (I used wonderfluff in “bare”)
- Scrap yarn to embroider eyes and nose
- Tapestry needle
- Wool to stuff with
- 3.5 mm needles (both straight and circular)
- Scissors
- Stitch marker
Stitches Used for Knit Mouse:
- Knit
- Purl
- KFB (knit front and back)
- SSK (slip slip knit)
- K2TOG (knit two together)
- K3TOG (knit three together)
Note: Although I used what is technically bulky yarn, I feel that the “bulky” Wonderfluff yarn I used should really be classified more as a worsted weight yarn. In other words — if all you have is worsted weight yarn in your stash, double check your gauge, but it should all turn out just fine.
Gauge: 7 stitches wide by 7 stitches tall makes one square inch (1″).
Step 1: Knitting the Mouse BODY
With 3.5 mm circular needles and bulky weight yarn, cast on 21 stitches. Slip to join (20 stitches total), and distribute stitches evenly onto both needles (10 stitches on each needle).
Place marker, and move marker with each new row.
Round 1: Knit
Round 2: K1, KFB, Knit to last 2 stitches on first needle, KFB, K1. Repeat for second needle (24 stitches total)
Round 3: Knit
Round 4: K1, KFB, Knit to last 2 stitches on first needle, KFB, K1. Repeat for second needle (28 stitches total)
Round 5: Knit
Round 6: Knit
Round 7: Knit
Round 8: Knit
Round 9: Knit
Round 10: Knit
Round 11: Knit
Round 12: K1, SSK, Knit to last 3 stitches on first needle, K2TOG, K1. Repeat for second needle. (24 stitches total)
Round 13: Knit
Round 14: K1, SSK, Knit to last 3 stitches on first needle, K2TOG, K1. Repeat for second needle. (20 stitches total)
Round 15: Knit
Round 16: Knit
Round 17: Knit
Round 18: Knit
Round 19: Knit
Round 20: K1, SSK, Knit to last 3 stitches on first needle, K2TOG, K1. Repeat for second needle. (16 stitches total)
Round 21: Knit
Round 22: K1, SSK, Knit to last 3 stitches on first needle, K2TOG, K1. Repeat for second needle. (12 stitches total)
Round 23: Knit
Round 24: K1, SSK, K2TOG, K1. Repeat for second needle. (8 stitches total)
Round 25: (K2TOG) four times. (4 stitches total)
Round 26: (K2TOG) twice. (2 stitches total)
Round 27: Move stitches to one needle, K2TOG. Break yarn, secure, and weave in ends.
Assembly: Fill with wool, sew closed the bottom of the body using tapestry needle and matching yarn. Weave in ends.
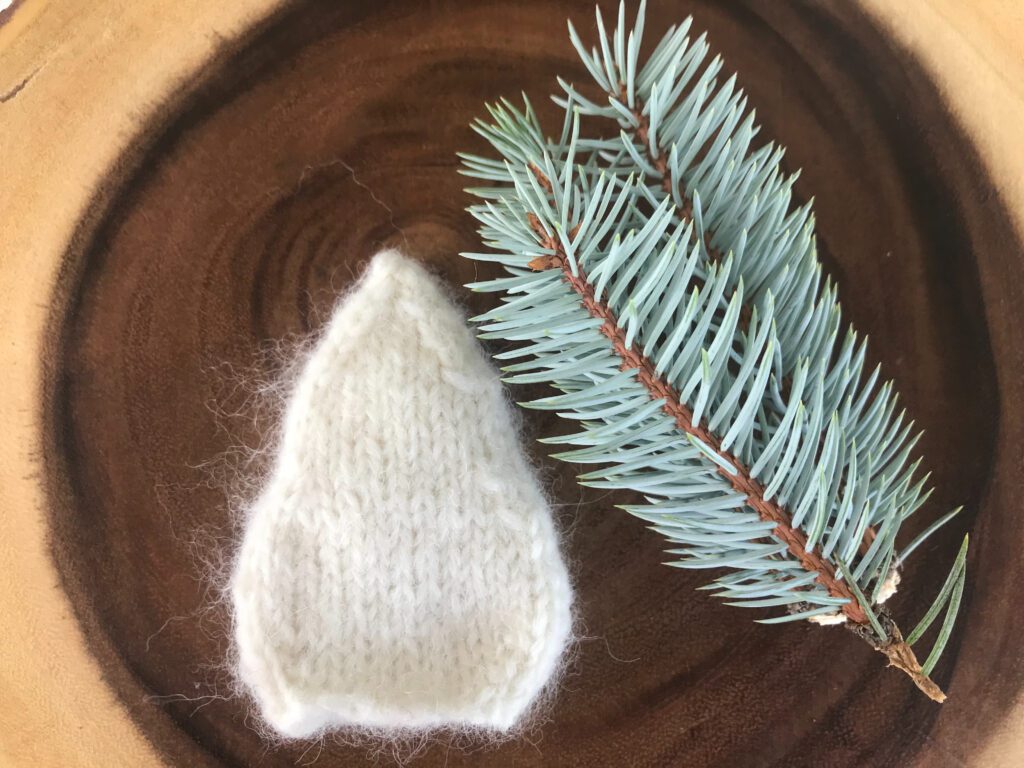
Step 2: Knitting the Mouse HEAD
Next, we will knit the mouse’s head.
Using the same size circular needles and yarn (3.5mm and bulky), cast on 13 stitches, and slip to join (12 stitches total on needles). Distribute evenly onto your needles (6 stitches on each needle).
Round 1: Knit
Round 2: K1, KFB, Knit to last 2 stitches on first needle, KFB, K1. Repeat for second needle. (16 stitches total)
Round 3: Knit
Round 4: K1, KFB, Knit to last 2 stitches on first needle, KFB, K1. Repeat for second needle. (20 stitches total)
Round 5: Knit
Round 6: Knit
Round 7: Knit
Round 8: Knit
Round 9: Knit
Round 10: K1, SSK, Knit to last 2 stitches on first needle, K2TOG, K1. Repeat for second needle. (16 stitches total)
Round 11: Knit
Round 12: K1, SSK, Knit to last 2 stitches on first needle, K2TOG, K1. Repeat for second needle. (12 stitches total)
Round 13: Knit
Round 14: K1, SSK, K2TOG, K1. Repeat for second needle. (8 stitches total)
Round 15: Knit
Round 16: SSK, K2TOG. Repeat for second needle. (4 stitches total)
Round 17: Knit
Round 18: K2TOG, K2TOG. (2 stitches total)
Round 19: Move stitches onto one needle, K2TOG. Break yarn, secure, and weave in ends.
Assembly: Stuff head with wool. Sew closed using tapestry needle and matching yarn. Weave in ends.
Step 3: Knitting the Mouse EARS
For the ears, you will switch over to straight needles!
With 3.5mm straight needles and bulky yarn, cast on 5 stitches.
Row 1: Knit
Row 2: Purl
Row 3: SSK, K1, K2TOG (3 stitches total)
Row 4: Purl
Row 5: K3TOG
Break yarn and secure.
Assembly: Sew to top of head, then weave in ends. Now that the ears are attached to the head, this is an excellent time to embroider little eyes (I used a french knot) and nose on your mouse!
Step 4: Knitting the mouse ARMS
Now we will work on the arms. You will notice that the legs and tail are made up the same way, just with different lengths.
Using circular needles (3.5mm) and bulky yarn, cast on 5 stitches, and slip to join (4 stitches total on needles).
Rounds 1 – 12: stockinette stitch (knit one row, purl the next).
Round 13: K2TOG, K2TOG (2 stitches total)
Round 14: Slip all stitches to one needle. K2TOG. Break yarn, secure ends.
Step 5: Knitting the Mouse LEGS
Using circular needles (3.5mm) and bulky yarn, cast on 5 stitches, and slip to join (4 stitches total on needles).
Rounds 1 – 21: Stockinette stitch (knit one row, purl the next).
Round 22: K2TOG, K2TOG (2 stitches total)
Round 23: Slip all stitches to one needle. K2TOG. Break yarn, secure ends.
Step 6: Knitting the mouse TAIL
Now we’re onto the tail!
Using circular needles (3.5mm) and bulky yarn, cast on 5 stitches, and slip to join (4 stitches total on needles).
Rounds 1 – 28: Stockinette stitch (knit one row, purl the next).
Round 29: K2TOG, K2TOG (2 stitches total)
Round 30: Slip all stitches to one needle. K2TOG. Break yarn, secure ends.
Assembly
Now that you have completed knitting all of your pieces, it’s time to assemble your mouse!
If you haven’t already, stuff your head and body with wool and sew them closed, using a tapestry needle and matching yarn.
With your head facing nose OUT, sew the head to the top of the body. (The bottom of the body should be wider at the bottom)
Attach your arms, legs, tail, and ears. Secure tightly, and leave a long tail of yarn. Weave those long tails of yarn deeply into the body.
Using scrap yarn or embroidery floss, make a little nose and two little eyes. Again, weave your ends into the body so that they are unnoticed.