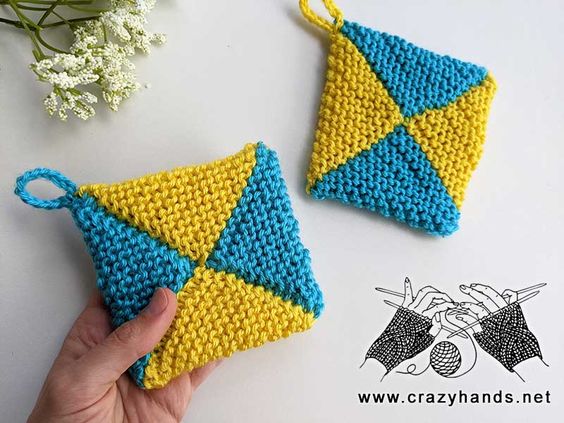
Knitted Square Pot Holder with a Hanger
Hey there! Imagine a cozy kitchen adorned with a charming Knitted Square Pot Holder with a Hanger hanging by the stove, ready to grip your hot pots and pans in style and keep your hands safe. This delightful piece not only adds a touch of warmth to your kitchen decor but also serves a practical purpose by preventing burns and scratches on your countertops. The knitted texture provides both insulation and a sturdy grip, making it a handy companion for your culinary adventures. With its cute hanger, it's easy to store and display, adding a touch of handmade charm to your cooking space. It's the perfect blend of functionality and aesthetics, making it a must-have for any kitchen enthusiast looking to elevate their cooking experience with a dash of comfort and style.
Knitting materials and tools:
<> Straight or DPN 4 mm (US6 / UK8)
<> Caron, Simply Soft (4) – 100% acrylic. Color A – blue, Color B – yellow
<> Crochet hook 3.5 or 4 mm for the hanger.
Knit squared pot holder size:
Gauge: 17-18 sts –10 cm (4 inches).
Size: 10.5*10.5 cm
Common abbreviations of knit stitches:
k – knit
st(s) – stitch(es)
sel s – selvage stitch: always slip the first stitch knitwise, work to the last stitch, purl the last stitch
Square pot holder knitting pattern:
Color A: Cast on 14 sts.
Row 1: sel s, k12, sel s. Turn.
Repeat Row 1 until the height of the square matches its width. Cut the yarn leaving a 20 cm tail.
Color B: In the rows where you change color, always knit the first stitch instead of slipping it. Slip the first stitch in all other rows. Repeat Row 1 for the same number of times as the previous color section. Cut the yarn leaving a 20 cm tail.
Color A: Repeat Row 1 for the same number of times as the previous color section. Cut the yarn leaving a 20 cm tail.
Color B: Repeat Row 1 for the same number of times as the previous color section.
Bing off all stitches. Cut the yarn leaving a 20 cm tail.
Assembly:
-
- Lay your strip of squares flat.
- Fold each square diagonally, bringing the corners together to form triangles.
- Align all edges and corners so that they meet properly.
- Sew along the edges where the squares meet to secure them into the envelope shape. Ensure all sides are neatly sewn for a tidy finish using the tails left after each color change. For sewing the sides, use the method where you insert the needle between two selvedge stitches on one side and then on the other side. Check the video tutorial for more instructions.
Hanger:
Attach the yarn to any corner, chain 10, and slip stitch back to the corner. Do not weave in the tails, simply hide them inside the pot holder.