Knitted Mothers’ Day Socks
There's something heartwarming about receiving a pair of hand-knitted Mother's Day socks - it's like a warm hug for her feet! Each stitch is woven with love and care, making them not just a gift, but a token of appreciation. The cozy feel of the soft yarn wrapping around her toes is a reminder of the thoughtfulness put into each loop. Whether they're adorned with colorful patterns or simply crafted in her favorite colors, these socks are a symbol of comfort and warmth. So, this Mother's Day, why not surprise her with a pair of knitted socks that not only keep her feet cozy but also warm her heart with your handmade gesture?
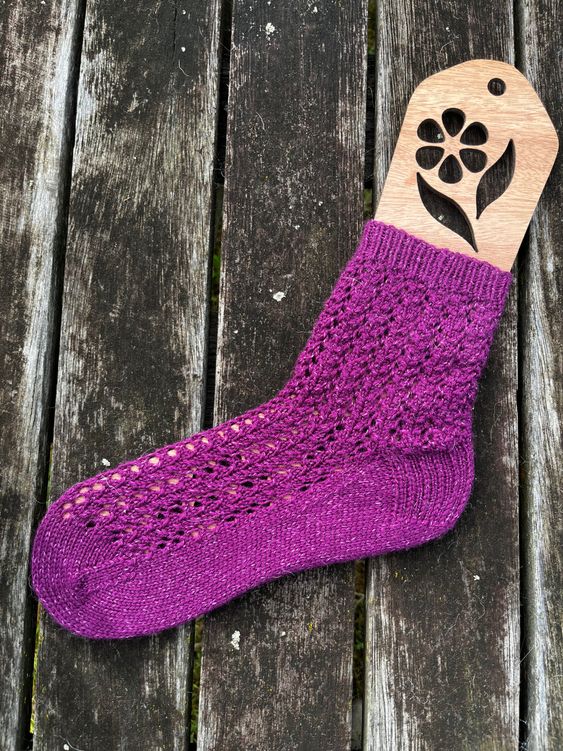
You will need:– 4ply sock yarn – in 2 shades. One main colour and one supporting shade for the stripes.
– 2 x 2.5mm circular needles (or a set of DPN’s. However you prefer to knit socks)
– 1 stitch marker
– Darning needle and scissors for the finishing up
Cuff
Cast on 56 stitches in your main colour. Join in the round. Place 28 stitches on each needle (or spread how you prefer to knit socks)
Knit 1, Purl 1 rib. Complete 10 rows of this K1, P1 rib over the whole cuff.
Main sock pattern:
Round 1: Knit all the stitches
Round 2: Knit 2 together, yarn over, knit 2 – repeat over the row
Round 3: Knit all the stitches
Round 4: Knit 2, yarn over, knit 2 together through the back loop – repeat over the row
Complete these 4 rows until you have the length sock you require. I recommend 12-15cm.
You can now remove the contrasting colour yarn as this is the end of the colour work.
Heel Flap
This occurs on ONLY needle 2 (or the second 28 stitches of your sock).
Row A (on the right side of just needle 2): Slip 1 purlwise, Knit 1, *(Slip 1 purlwise with yarn in back, knit 1). Repeat from * to end of the row on needle 2.
Row B (on the wrong side of just needle 2): Slip 1, purl to the end of the row on just needle 2.
Complete Row A and Row B 14 times for a total of 28 rows.
Heel turn:
This just creates a shape at the back of the foot. This is also just on needle 2 directly following the heel flap. These are short rows, and do not go all the way to the end of the needle. It is very much a case of “trust the process” if you haven’t made socks in this way before.
Row C: Slip 1 purlwise, knit 14, knit 2 together, knit 1. Turn your work.
Row D: Slip 1, purl 3, purl 2 together, purl 1. Turn your work.
Complete these 2 rows (Row C and Row D) on needle 2 only.
Row E: Slip 1 purlwise, knit to one stitch before the gap in your work, knit 2 together, knit 1. Turn your work.
Row F: Slip 1, purl to one stitch before the gap in your work, purl 2 together, knit 1
Complete these 2 rows until you have knitted the last stitch on each end of needle 2.
Row G: Slip 1, knit to the last 2 stitches, knit 2 together.
Row H: Slip 1, purl to the last 2 stitches, purl 2 together.
Complete these 2 rows on needle 2 – or the second 28 stitches of your sock.
Heel Gusset
This bit can be a bit confusing, but it will make sense as you knit a few rows. The first bit is a set up bit.
NEEDLE 2: Knit 7 stitches on needle 2. Place a marker here. This is the centre of the back of the heel. Knit 7 stitches. You are now at the end of the stitches on needle 2. Pick up and knit 15 stitches along the side of the heel flap. This will be the slipped stitches on the edge (these will be easy to see), and then 1 extra pick up from the leg before needle 1.
NEEDLE 1: Knit – continuing the pattern from the top of the sock
NEEDLE 2: Pick up and knot the leg from between the stitches on needle 1 and needle 2. Pick up and knit the 14 slipped stitches on the edges of the heel flap. Knit 7 stitches. Slip marker. Knit until the last 3 stitches on needle 2, knit 2 together, knit 1.
NEEDLE 1: Knit – continuing the pattern from the top of the sock
NEEDLE 2: Knit 1, SSK (slip 1 as if to knit, slip 1 as if to knit, knit the 2 slipped stitches together which creates a decrease). Knit to marker.
Now it is a bit easier to work out what is happening by counting from marker to marker.
ROW I: Knit to the end of needle 2, continue knit needle 1, on needle 2 knit to marker.
ROW J: Knit to the last 3 stitches on needle 2. Knit 2 together, knit 1. Continue knit 1. On needle 2, knit 1, SSK, knit to marker.
Repeat Row I and Row J until you have 28 stitches on needle 2. I use this marker to check that I have 14 stitches on each side of the needle.
Knit the 14 stitches remaining on needle 2 bringing you back to ordinary row counting. You can remove the marker at this point.
Foot section
These are just knitting in the round until your sock is the right length. I measure this as the back of your heel to the base of your big toe. The toe shaping adds a few more cms to the sock, generally the about the length of your big toe.
Knit rows until your sock reaches your toe.
Toe shaping
ROW K: On needle 1: Knit 1, SSK, knit to the last 2, K2 together. Repeat on Needle 2. This decreases 2 stitches per needle, or 4 per row
ROW L: Knit all stitches.
Repeat ROW K and ROW L until you have 14 stitches remaining on each needle.
Kitchener bind off the toe of your sock.
Now make a second sock, darn in your ends, and wear your socks.