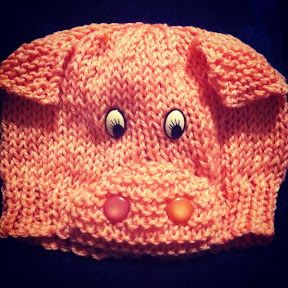
Knitted Pig Beanie
The Knitted Pig Beanie is an adorable and charming accessory that adds a touch of whimsy to any outfit. With its soft material and cute pig design, it not only keeps you warm but also brings smiles to those around you. Whether you're wearing it for fun during the winter months or just want to showcase your love for pigs, this beanie is sure to be a conversation starter wherever you go. Its high-quality knit ensures durability and comfort, making it a delightful addition to your hat collection. Embrace your playful side and stay cozy in style with the delightful Knitted Pig Beanie - the perfect accessory for spreading warmth and joy!

You will need
4mm needles
5.5mm needles
Pink dk wool
Stuffing
2 pink buttons
2 eyes
Main hat
On size 4mm needles, cast on 70 stitches.
Rib (knit 1, purl 1) the first 10 rows.
Change to 5.5mm needles
Stst 30 rows
Row 41: knit 3, knit 2 together – repeat to end
Row 42: purl
Row 43: knit 2, knit 2 together – repeat to end
Row 44: purl
Row 45: knit 1, knit 2 together – repeat to end
Row 46: purl
Row 47: knit 2 together – repeat to end
Row 48: purl
Row 49: knit 2 together – repeat to end
Cut yarn. Thread remaining stitches onto thread and pull to tighten.
Using a crochet hook and pink wool, pick up 22 stitches from the centre front of the hat.
Work in garter stitch (knit all rows) slipping the first stitch of each row
Knit 10 rows
11 – 20: s1, k1, psso, knit to last 2, knit 2 together.
21: cast off.
Ears – make 2
Cast on 20 on 4mm
1: knit
2: knit
3: k2 tog, knit to end, k2tog
4: knit
Repeat rows 3 and 4 until 2 stitches remain. Knit those 2 together, cut yarn, thread through remaining stitch.
Assembling
Sew the side of the hat from top to bottom using the yarn from the casting off.
Fold flap upwards and stitch around on the hat, leaving a 2cm gap. stuff this section, and close the gap. Using 2 buttons, sew on nostrils, pulling tight through the stuffing.
Sew on the ears on the sides. Finally attach 2 eyes to the front of the hat.