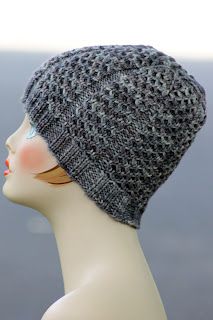
Knitted Fun Lance Hat
Experience the joy of wearing a cozy Lance hat that has been lovingly crafted with intricate knitting techniques. This unique accessory is not only stylish but also provides warmth and comfort during the colder months. The attention to detail in the design ensures that you stand out from the crowd while staying snug and fashionable. Indulge in the fun and charm of a hand-knitted Lance hat that adds a touch of personality to your outfit. The craftsmanship that goes into creating each hat guarantees a high-quality accessory that is both durable and trendy. Whether you're out for a casual stroll or hitting the slopes, this knitted hat is the perfect blend of style and functionality.

Yarn: Malabrigo Rios (100% Merino Superwash; 210 yards [192 meters]/100 grams); #43 Plomo - one skein
Needles: One 16" circular needle in size US 5, one 16" circular needle in size US 7, one set of double pointed needles (dpns), also in size US 7, and one cable needle (cn)
Notions: Tapestry needle, stitch marker
Gauge: 20 stitches = 4 inches on size 7 needles
So let's make a fun (and fancy) Lance hat, shall we? To get started, then, using your size US 5 circular needle, cast on 112 stitches, place marker, and join in round. Then we'll knit some ribbing rows as follows:
Ribbing Row: * (p2, k2) three times, p2; rep from *
Knit this ribbing row 8 times. Then, switch to your size 7 circular needle, and we'll begin the main pattern, which includes panels of Wave of Honey Stitch from page 272 of Barbara G. Walker's A Treasury of Knitting Patterns. To work it, we'll use the following notation:
front cross (fc): slip 1 stitch to cn and hold in front; k1; k1 from cn
back cross (bc): slip 1 stitch to cn and hold in back; k1; k1 from cn
And now that we know our terms, we'll continue like so:
Rows 1 & 3: * p1, k12, p1 *
Row 2: * p1, (bc, fc) 3 times, p1 *
Row 4: * p1, (fc, bc) 3 times, p1 *
Knit rows 1 - 4 until piece measures roughly 6" - 7" (depending on how long you want it, of course - I would go 6" for a smaller head and most women, and 7" for a larger or most men) and you've just finished row 1 of the pattern. Now, it's time to begin the decreases, as follows:
Decrease Row 1: * p1, (bc, fc) 3 times, p2, ssk, (fc, bc) twice, k2tog, p1 * (104 stitches)
Decrease Row 2: * p1, k12, p2, k10, p1 *
Decrease Row 3: * p1, (fc, bc) 3 times, p2, ssk, k1, fc, bc, k1, k2tog, p1 * (96 stitches)
Decrease Row 4: * p1, k12, p2, k8, p1 *
Decrease Row 5: * p1, (bc, fc) 3 times, p2, ssk, bc, fc, k2tog, p1 * (88 stitches)
Decrease Row 6: * p1, k12, p2, ssk, k2, k2tog, p1 * (80 stitches)
You may want to switch to your dpns about now...
Decrease Row 7: * p1, (fc, bc) 3 times, p2, ssk, k2tog, p1 * (72 stitches)
Decrease Row 8: * p1, ssk, k8, k2tog, p2, k2, p1 * (64 stitches)
Decrease Row 9: * p1, ssk, k1, bc, fc, k1, k2tog, p2, fc, p1 * (56 stitches)
Decrease Row 10: * p1, ssk, k4, k2tog, p2, k2, p1 * (48 stitches)
Decrease Row 11: * p1, ssk, k2, k2tog, p2, bc, p1 * (40 stitches)
Decrease Row 12: * p1, ssk, k2tog, p2, k2, p1 * (32 stitches)
Decrease Row 13: * (p2tog) twice, p1, fc, p1 * (24 stitches)
Decrease Row 14: * p2tog, p1, k2, p1 * (20 stitches)
Decrease Row 15: * k2tog * (10 stitches)
Clip yarn tail, thread through final 10 stitches, and pull tight. Thread to inside of hat, knot, and tuck in ends.