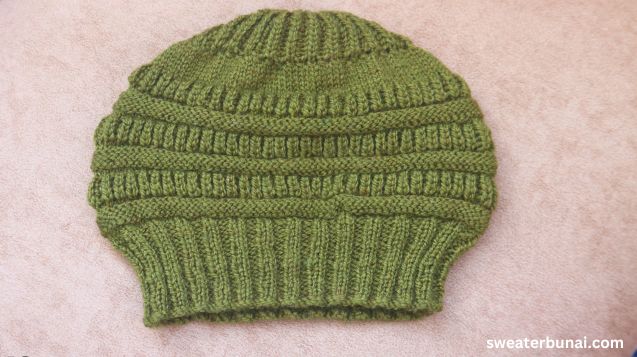
Knitted Men’s Slouchy Hat
Step up your winter fashion game with our latest creation, the Cozy Men's Slouchy Hat! Crafted with love and care, this knitted masterpiece is designed to keep you warm and stylish during the chilly months. Made from high-quality yarn, this hat offers a perfect blend of comfort and durability. Whether you're heading out for a casual stroll or meeting friends for a coffee, this hat is the perfect companion to elevate your style. With its soft and cozy texture, you'll never want to take it off! So, embrace the winter season in style with our Knitted Men's Slouchy Hat.
Knitting Materials
Knitting Needles- 3.25 ( 10 number ) MM Straight Needle.
Knitting Yarn- 85 Gram 4ply Yarn.
Knitting Abbreviation
K – Knit
P – Purl
STS – Stitches
K2tog – Knit 2 sts together
SL – Slip
SSK – Slip Slip Knit
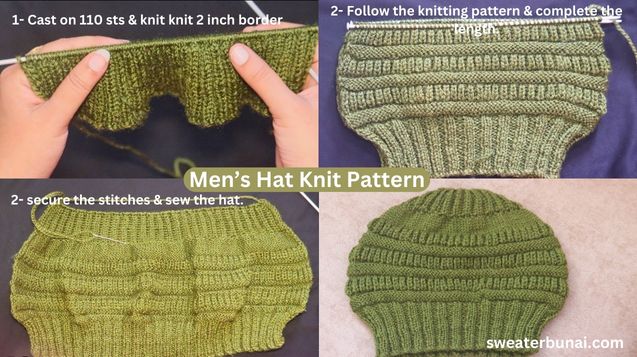
Free Men’s Slouchy Hat Knit Pattern with Straight Needles
To knit this Slouchy Hat, we’ll start by knitting the border. After that, we’ll increase the stitches for the hat. Once we’ve increased the stitches, we’ll add the design to the hat.
The shape of the cap looks like a pot. So, to achieve the shape of a pot in this hat, we’ve decreased the stitches twice. Let’s begin by knitting 2×2 rib stitch pattern for the border.
Knit Rib Stitch Hat Border
I have knit the border using a simple 2×2 rib stitch pattern. The pattern for the border is as follows:
Cast on– Cast on 110 sts on the needles.
Row 1 ( RS ) – * K2, P2 * repeat from * to * till end of the row
Row 2 ( WS ) – Knit in knit & Purl in purl
Follow both two rows and knit a 2-inch rib stitch border.
After completing the border, we will proceed to increase the stitches in the hat. We will be increasing stitches ( 22 STS ) from the wrong side.
Wrong Side – SL1, P3, * increase a sts, P5 * repeat from * to * ………….last 2 sts Increase a sts, P2.
Now we have 132 sts on the needle.
Free Slouchy Hat Knit Pattern
Here I have added a simple and evergreen Hat Knit Pattern. Even beginners will find it easy to knit because it’s based on a knit-and-purl pattern only. The pattern for this design is as follows:
Row 1 – Knit all sts
Row 2 – Purl all sts
Row 3 – Purl all sts
Row 4 – Knit all sts
Row 5 – Purl all sts
Row 6 – Knit all sts
Row 7 – Knit all sts
Row 8 – Purl all sts
Row 9 – * K1, P1 * repeat from * to* till end of the row
Row 10 – Knit in knit & Purl in Purl ( Knit sts always knit from the below the sts )
Row 11 – Same as row 10
Row 12 – Same as row 10
Row 13 – Same as row 10
Row 14 – Same as row 10
Row 15 – Same as row 10
Row 16 – Same as row 10
Repeat rows 1 to 16 again.
Decreasing Stitches
After knitting the pattern twice, we need to bind off some stitches when repeating the pattern a third time.
Repeat rows 1 to 2.
Row 3 – * P6, P2tog * repeat from * to * …………….. last sts P4
Repeat rows 4 to 16 again.
Now we have 116 stitches after decreasing.
We have knitted the design three times, and now we will make some knit and purl rows.
RS – Knit all sts
WS – Purl all sts
RS – Knit all sts
WS – Purl all sts
RS – Knit all sts
WS – Purl all sts
RS – Knit all sts
WS – Purl all sts
RS – Knit all sts
WS – Purl all sts
The second time, we will decrease the stitches.
RS – SL1, SSK, SSK, SSK, SSK …………….. last sts K1
After decreasing, we have 59 stitches now.
After decreasing the stitches for the second time, we must knit the design using the remaining stitches and complete the cap’s length.
WS – SL1, * K1, P1 * repeat from * to * till end of the row.
RS – Knit in knit & Purl in Purl ( Knit sts always knit from the below the sts)
Repeat the last row on both sides and complete the length of the cap 8.5 or 9 inches. After completing the length of the cap all stitches take on the swing needle and secure tightly all the stitches. At last, sew the cap.