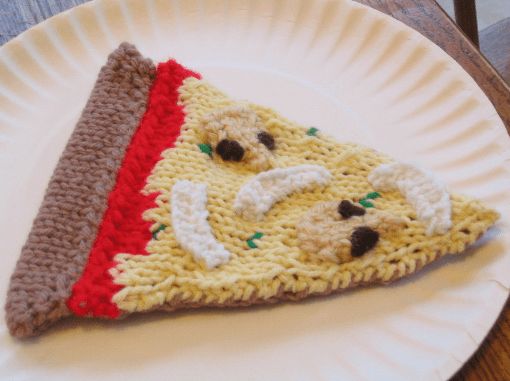
Knitted Beautiful Pizza
Oh, let me tell you about these adorable knitted beautiful pizza items! They are as charming as they are delicious-looking, with their intricate designs and vibrant colors that bring a slice of fun to any room. It's truly a delight to see the creativity and craftsmanship that goes into making these quirky pieces. Whether you're a pizza lover or simply appreciate unique art, these knitted beauties are sure to bring a smile to your face. So, go ahead and add a touch of whimsy to your space with these one-of-a-kind creations that are both cozy and oh-so charming!
Crust
With US #7 needles and tan yarn, CO 20
Row 1 and all other odd-numbered rows, unless otherwise noted: P
Row 2 and 4: K1, kfb, k all stitches until last 2, kfb, k1
Row 6 and 8: K
Row 10 and 12: K1, k2tog, k all stitches until last 3, ssk, k1
Row 14 and 16: K
Row 18: K1, k2tog, k all stitches until last 3, ssk, k1
Row 20: K
Row 22: K1, k2tog, k all stitches until last 3, ssk, k1
Row 24 and 26: K
Row 28: K1, k2tog, k all stitches until last 3, ssk, k1
Row 30: K
Row 32: K1, k2tog, k all stitches until last 3, ssk, k1
Row 34: K
Row 36: K1, k2tog, k all stitches until last 3, ssk, k1
Row 38: K
Row 40 and 42: K1, k2tog, k all stitches until last 3, ssk, k1
Row 44: K1, k2tog, ssk, k1
Row 46: K1, k2tog, k1
Row 47: K3tog, Tie off.
To make up the crust, fold over the top of the triangle you just knit, aligning sides so that the increases and decreases match. Hand-sew this flap down, WS facing (the bottom of your pizza will have the smooth side of the stockinet stitch, and all of the bumpy side will eventually be covered by the other pieces.)
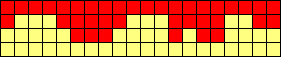
Sauce / Cheese
To achieve the correct coloration, please refer to the color chart below for the first four rows, continuing in yellow after it is completed.
CO 20
Row 1, and all other odd rows, unless otherwise noted: P
Row 2: K
Row 4: K1, k2tog, k all stitches until last 3, ssk, k1
Row 6: K
Row 8: K1, k2tog, k all stitches until last 3, ssk, k1
Row 10 and 12: K
Row 14: K1, k2tog, k all stitches until last 3, ssk, k1
Row 16: K
Row 18: K1, k2tog, k all stitches until last 3, ssk, k1
Row 20: K
Row 22: K1, k2tog, k all stitches until last 3, ssk, k1
Row 24: K
Row 26 and 28: K1, k2tog, k all stitches until last 3, ssk, k1
Row 30: K
Row 32: K1, k2tog, ssk, k1
Row 34: K1, k2tog, k1
Row 35: K3tog, Tie off.
Mushroom
Switching over to US #4 needles for the toppings, in a light cream yarn, CO 2
Row 1 and all other odd rows: P
Row 2: K
Row 4: Kfb, kfb
Row 6: Kfb, k2, kfb
Row 8: K
Row 10: P2tog, p2, p2tog
BO
With darker brown yarn, hand-embroider the details of the bottom of the mushroom cap, referring to the photo if necessary.
Onion
In white yarn, CO 16
Row 1: K2tog across
BO
*For alternate toppings, the technique for the onion can easily make peppers, using either green or red yarn instead of the white.
To assemble: First, weave in ends on all the toppings and sew them securely to the cheese piece in whatever arrangement pleases you. Then smooth out the sides of the sauce / cheese piece (the edges will want to curl, as with any piece knit in stockinet) and align the sides evenly with that of your crust. With WS together, (both RS’s should be outwards and visible) whip stitch the edges together with the crust color, and be sure to also sew down the top part near the folded edge of the crust. Tie tight, and hide the ends underneath the cheese.
Enjoy, but don’t eat!