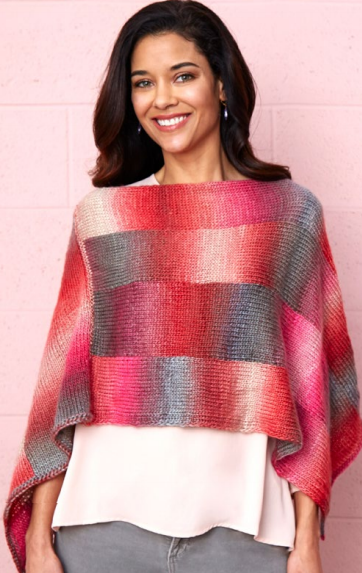
Knitted Bargello Poncho
The Knitted Bargello Poncho is a stunning and intricate piece of wearable art that showcases the beauty of the Bargello stitch. The poncho's intricate pattern and bold colors create a dramatic and eye-catching statement piece that's perfect for making a fashion statement or adding a touch of sophistication to any outfit.

Notes
Directions are for size Small. Changes for sizes Medium/Large, and 2X-Large/ 3X-Large are in parentheses. Note that directions do not include an X-Large size. If X-Large size is needed, choose between Medium/Large and 2X-Large/3X-Large.
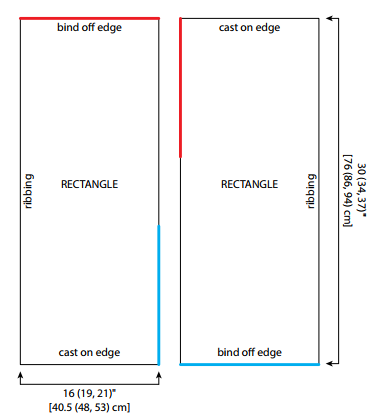
To Fit Bust: 32–34 (38–42, 50–54)" [81.5–86.5 (96.5–107, 127–137) cm] Each rectangle measures about 16 (19, 21)" [40.5 (48.5, 53.5) cm] wide and 30 (34, 37)" [76 (86.5, 94) cm] long, after blocking.
Knitting Needle Size8 or 5 mm
Yarn Weight(4) Medium Weight/Worsted Weight and Aran (16-20 stitches to 4 inches)
Gauge
19 sts = 4" [10 cm]; 23 rows = 4" [10 cm] in Stockinette stitch (knit on right side, purl on wrong side).
Materials List
- RED HEART® Unforgettable®: 4 (4, 5) balls 3939 Heirloom
- Susan Bates® Knitting Needles: 5mm [US 8]
- Susan Bates® Crochet Hook: 5mm [US H-8]
- 3 (3, 4) stitch markers
- 4 (4, 5) zip-closure plastic baggies
- 1 zip-closure plastic baggie large enough to hold all the balls of yarn in smaller baggies
- permanent marker
- yarn needle
Instructions
NOTES
1. Poncho is made from two identical rectangles that are sewn together. Each rectangle is worked back and forth in rows changing color to make 4 (4, 5) intarsia columns.
2. When changing yarn, always pick up the new yarn from under the yarn being dropped to link the yarns and prevent holes.
3. Before beginning, examine the starting colors of each ball of yarn. Make sure that each ball starts on a different color. Winding off a few yards may be needed to ensure that the starting colors are all different.
4. To minimize tangling, place each ball into its own zip-closure plastic baggie with the end of yarn hanging out and the baggie zipped almost all the way closed. With permanent marker, label each baggie with one of A, B, C, and D for sizes Small and Medium/Large. Label each baggie with one of A, B, C, D, and E for size 2X-Large/3X-Large.
Rectangle (make 2)
With A, cast on 76 (84, 94) sts. Knit 2 rows.
- Sizes Small and Medium/Large Only:
Set-Up Row 1 (right side): Slip 1, k18 (20), drop A, place marker; join B and k18 (20), drop B, place marker; join C and k18 (20), drop C, place marker; join D and k16 (18), p1, k1, p1, k2. - Size 2X-Large/3X-Large Only:
Set-Up Row 1 (right side): Slip 1, k18, drop A, place marker; join B and k18 drop B, place marker; join C and k18, drop C, place marker; join D and k18, drop D, place marker; join E and k16, p1, k1, p1, k2. - All Sizes:
Set-Up Row 2 (wrong side): Working each intarsia section with its own yarn and linking yarns to prevent holes (see note 2), slip 1, [p1, k1] twice, purl to end of row. - Place all the bagged yarns into the larger zip-closure baggie. Placing the yarns in the larger baggie ensures that for the duration of the project it will not be necessary to reposition the yarn balls as you work. The yarns will link with each other while working a right side row then unlink themselves after completing the following wrong side row. If you notice that this is not happening and the yarns are tangled, check your work to see if a single yarn was used across more than one intarsia column. If this is the case, undo your work to the point where this occurred. Continue to work each intarsia section with its own yarn and link yarns to prevent holes, as you work all remaining rows of rectangle.
- Next Row (right side): Slip 1, knit to last 5 sts, p1, k1, p1, k2.
- Next Row (wrong side): Slip 1, [p1, k1] twice, purl to end of row.
- Repeat last 2 rows until rectangle measure about 30 (34, 37)" [76 (86.5, 94) cm] from beginning, end with a wrong side row.
- Cut all yarns except A .
- With A only, knit 2 rows.
- Bind off.
Finishing
- Block rectangles to measurements shown on schematic.

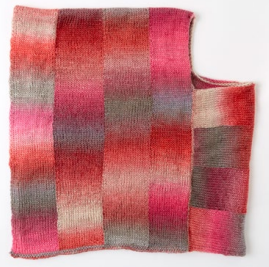
- Sew rectangles together where indicated on schematic, sewing red line to red line and blue line to blue line.
- Neck Edging
With right side facing, crochet hook and most plentiful remaining ball of yarn, join with slip st anywhere in next edge, chain 1, single crochet evenly spaced around neck edge; join with slip st in first single crochet. Fasten off. Weave in ends.

Abbreviations
- A, B, C, etc.
- Yarn A, Yarn B, Yarn C, etc
- k
- knit
- p
- purl
- st(s)
- stitch(es)
- [ ]
- work directions in brackets the number of times specified