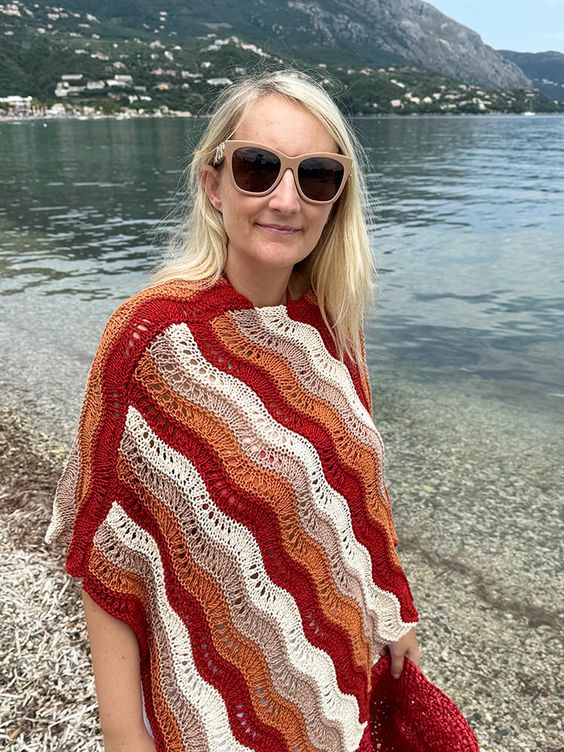
Knitted Ripples and Ridges Poncho
The Knitted Ripples and Ridges Poncho is a cozy and stylish addition to any wardrobe. With its intricate patterns of ripples and ridges, this poncho brings a touch of handmade charm to your outfit. Perfect for cool weather, this piece is not only fashionable but also wonderfully functional, keeping you warm and comfortable all day long. Whether you're out for a casual stroll or cozying up at home, this poncho is sure to elevate your style with its unique design. Embrace the autumn breeze or winter chill in style with this lovely and versatile piece!
Yarn
- The Cotton (from We Are Knitters) is in four colors.
- Yarn A = Terracotta x (1, 2, 2, 3, 3, 4)
- Yarn B = Copper x (1, 2, 2, 3, 3, 4)
- Yarn C = Taupe x (1, 2, 2, 3, 3, 4)
- Yarn D = Natural x (1, 2, 2, 3, 3, 4)
- This yarn is 3.5 oz/100g/232 yds/212 m.
- Aran/worsted yarn/10-ply yarn.
- The total amount needed for each size in yards is 928, 1,856, 1,856, 2,784, 2,784, and 3,712.
- Cotton yarn is a great option for making your own poncho.
Needle Size
- 5 mm (US size 8) Knitting needles
- I used a circular needle because there were many stitches.
- The pieces are knit flat back and forth – not in the round.
Notions
- Scissors
- Darning needle/yarn needle
- Tape measure
Knitting Abbreviations
- Approx – Approximately
- Beg – Beginning
- Cont – Continue(ing)
- K – Knit
- K2tog – Knit the next two stitches together (Decrease)
- P – Purl
- Rem – Remaining
- Rep – Repeat
- RS – Right side
- SSK – Slip Slip Knit (Decrease)
- St(s) – Stitch(es)
- WS – Wrong side
- YO – Yarn over
Poncho Knitting Pattern Instructions
This stitch pattern is worked in multiples of 13 stitches.
Make two pieces the same (They are both one long rectangle).
With Yarn A cast on 78 (91, 104, 117, 130, 143) sts.
- Row 1 (RS): Knit
- Rows 2 (WS) and 3: Knit
- Row 4: Purl
- Row 5: *K4, (YO, K1) 5 times, YO, K4; rep from * to end.
- Row 6: Purl
- Row 7: *(K2tog) 3 times, K7, (SSK) 3 times; Rep from * to end.
- Row 8: Knit
- Yarn B – Rep rows 1-8
- Yarn C – Rep Rows 1-8
- Yarn D – Rep Rows 1-8
Continue to repeat rows 1-8, changing yarn color to start every new repeat section from Yarn A to Yarn D until the piece measures 27 (29, 33, 39, 47, 57) inches/68.5 (73.5, 84, 99, 119, 145) cm.
You can, of course, adjust the length for your size if you wish for it to be longer.
You may want to block your finished poncho before you start to seam it together and finish it off.
Making Up
Sew the cast-off edge of one piece to the side edge of the other piece, as shown in the diagram below.
You may need to leave a vent on each side of the neck edge to allow your head to fit through the hole.
Leave a vent/opening of 2 inches or 3 inches on either side.
Fold the excess inside the poncho neckline and catch down on the wrong side/inside with a couple of stitches.
This gives the neckline a nice turnover and shape, allowing your head to pass easily through the hole to take on and off.

Simple construction poncho diagram.
Neck Opening
Leave a neck opening on either side of the neckline for around 2-3 inches.

Seam the turned-over edge from the neck opening to create a neat rolled-over edge along the neckline.

You can see the finished neck edge here, which creates a slightly wider open collar.

Great Tips For Your Poncho
Creating a cotton light knitted poncho can be a rewarding project with the right approach.
Here are some tips to ensure success:
- Choose the Right Yarn: Opt for 100% cotton or a cotton blend yarn that’s lightweight and breathable. This will ensure your poncho is comfortable and suitable for warm weather.
- Gauge Swatch: Knit a gauge swatch to determine the correct needle size for your yarn. This helps ensure your poncho will have the right dimensions and fit.
- Loose Tension: Keep your tension relaxed to maintain the light and airy quality of the fabric. Tight knitting can make the poncho feel heavy and less breathable.
- Stitch Pattern: Select a stitch pattern that complements the cotton yarn, like the ripples and ridges pattern, which adds texture without adding bulk.
- Seamless Design: Consider a seamless or minimal-seam design to keep the poncho comfortable and avoid chafing. Circular needles can be useful for this purpose.
- Edge Finishing: Pay attention to the finishing touches, such as neat edges and secure weaving in of ends, to give your poncho a polished look.
- Blocking: Block your poncho after knitting to even out the stitches and achieve the desired shape and drape. Use a gentle, non-rinse wool wash suitable for cotton.
By following these tips, you’ll create a stylish and comfortable cotton poncho that’s perfect for the beach or any casual outing.