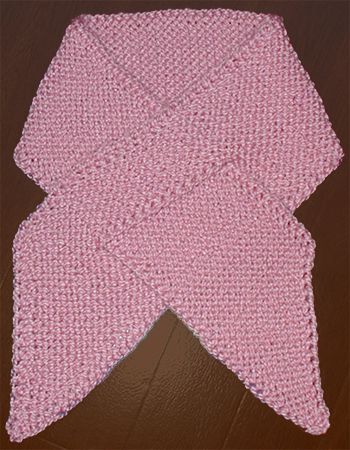
Knitted Pink Ribbon Scarf
The knitted pink ribbon scarf is an adorable accessory, perfect for adding a touch of charm and warmth to your outfit. The soft, pink yarn is cozy against your skin and the delicate ribbon pattern adds a sweet and feminine touch. Whether you're heading out on a chilly day or simply want to elevate your look with a pop of color, this scarf is sure to be your go-to piece. It's a versatile and stylish accessory that can easily be dressed up or down, making it a must-have in any wardrobe. With its handmade feel, this scarf not only keeps you cozy but also adds a personal touch to your ensemble. Wrap yourself in the comfort and style of the knitted pink ribbon scarf and feel fabulous wherever you go!

Finished Measurements: 5 1/2 inches by 42 inches
Gauge: 13 st = 4 inches in garter stitch
Yarn: bulky weight, approximately 120 yds. (sample was knit with one skein of Bernat Softee Chunky, color: Antique Rose)
Needle size: 11
Abbreviations
slp = slip as if to purl
k = knit
st = stitch
kfb = knit in the front and back of next stitch (increase)
k2tog = knit two stitches together (decrease)
Pattern Notes
To create the chain-stitch edge, slip the first stitch of each row purlwise, with the yarn in front, then move the yarn between the needles to the back (without wrapping over the needles). Keep the edge stitches along the increase and decrease edges a bit loose.
Use a safety pin to mark the right side.
Pattern
Cast on 2 st.
Row 1: (right side) slp 1, kfb.
Row 2: (wrong side) slp 1, k to end.
Row 3: slp 1, k to last 2 st, kfb, k.
Repeat rows 2 and 3 until there are 18 st total.
Repeat row 2 until scarf is 29 inches long from beginning, ending with a wrong-side row.
Keyhole
K 9 st (half total number of st), drop the working yarn and using a new strand of yarn, k remaining st.
Now continue working each side of the keyhole in pattern with separate strands of yarn, k until keyhole measures approximately 5 1/2 inches (width of scarf).
K across all st with same ball of yarn, continue in pattern as before keyhole for another 2 1/2 inches, ending with a wrong-side row.
Decreases (starting with a right side row)
Note: in order to get the right shape with the points, be sure to work decreases on the same edge that you increased on back at the beginning of the scarf – it will essentially be a long trapezoid.
Row 1: slp 1, k to last 3 st, k2tog, k 1.
Row 2: slp 1, k to end.
Repeat rows 1 and 2 until there are 3 st left.
K 3 st together and bind off.