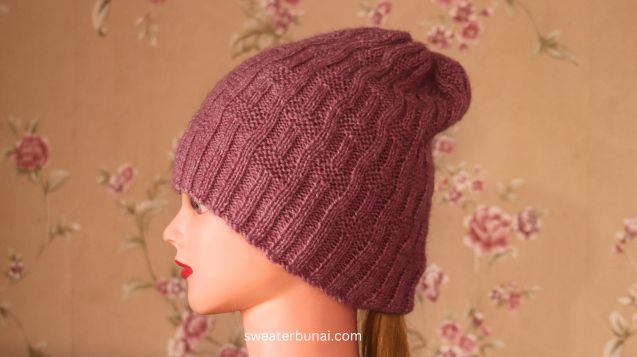
Knitted Unisex Beanie
Step up your winter fashion game with our brand new Cozy Unisex Beanie! Crafted with love and care, this knitted beanie is the perfect accessory to keep you warm and stylish during the chilly months. Made from high-quality materials, our beanie is designed to provide ultimate comfort and durability, ensuring it will be your go-to headwear for years to come. Whether you're heading out for a casual stroll or a night out with friends, our Unisex Beanie is the perfect accessory to complete your outfit and keep you looking effortlessly stylish. So, why compromise on style when you can have both fashion and functionality with our Unisex Beanie?
Knitting Materials
Yarn- 70 Gram Vardhman Wool o Wool
Needles Size- 3.25MM Straight Needles
Optional- Measuring Tape, Scissors & Sewing Needle.
Common Abbreviations
- SL- Slip
- K – Knit
- P – Purl
- STS – Stitches
- RS – Right Side
- WS – Wrong Side
Sunayana’s Free Unisex Beanie Pattern
Size– One size, 18 to 24-inch head circumference.
Skill Level– Easy, Beginners.
Cast on– I have taken 114 stitches to knit the cap.
Knitting Border Pattern for Beanie
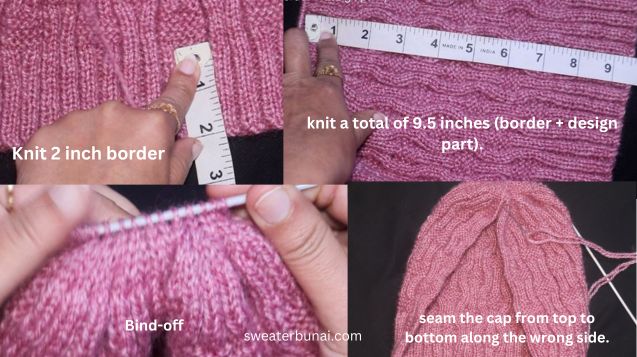
In this Beanie, we have knitted a simple 2/2 Rib border, and we have kept the border length at 2 inches. You can adjust the length of the border according to your preference. The pattern of the cap’s border is as follows:
Row 1 (RS) – SL1 * K2, P2 * repeat from * to * …………last sts P1
Row 2 (WS) – Knit in knit & Purl in purl
Repeat these 2 rows to complete a 2-inch border.
Easy Knit-Purl Stitch Pattern for Unisex Beanie on Straight Needles
The pattern used in the beanie is a simple knit and purl stitch pattern, but it looks like a cable pattern. This pattern consists of 16 rows, and to create it once, you will need 16 stitches. The pattern for the hat is given below:
Row 1 – SL1, * K2, P2, K2, P2, K2, P6 * repeat from * to * …………… last sts P1
Row 2 – SL1, * P8, K2, P2, K2, P2 * repeat from * to * …………….. last sts P1
Row 3, Row 5 & Row 7 – Same as Row 1
Row 4, Row 6 & Row 8 – Same as Row 2
Row 9 – SL1, * K2, P6, K2, P2, K2, P2 * repeat from * to * ……………. last sts P1
Row 10 – SL1, * K2, P2, K2, P2, P8 * repeat from * to * ……………. last sts P1
Row 11, Row 13 & Row 15 – Same as Row 9
Row 12, Row 14 & Row 16 – Same as Row 10
Repeat rows 1 to 16 and complete the length of the cap. I have knit a total of 9.5 inches (border + design part).
Shape The Crown (Crown Decreases)
By repeating these same 16 rows, we will complete the length of the beanie. You can adjust the length according to your preference.
Once the beanie reaches its desired length, we will proceed to shape the crown. Before binding off, the beanie should measure 9.5 inches in length. Here, the beanie will be bound off in just 6 rows, so we will start binding off only after completing the full length.
The bind-off process is explained below in the given pattern.
Row 1 (RS) – SL1, K2tog, K2tog, K2tog………………. last sts P1
Now I have a total of 58 sts.
Row 2 (WS) – Purl all sts
Row 3 (RS) – SL1, K2tog, K2tog, K2tog………………. last sts P1
Now I have a total of 30 sts
Row 4 (WS) – Purl all sts
Row 5 (RS) – SL1, K2tog, K2tog, K2tog………………. last sts P1
Now I have a total of 16 sts.
Row 6 (WS) – Purl all sts
Our hat is ready, and we need to seam it. First, we’ll thread the yarn into the sewing needle. Then, we’ll secure the remaining 16 stitches onto the needle, pulling them tightly to secure them.
We’ll seam the cap from top to bottom along the wrong side.